|
Industrial Calibration
1.0.0
|
|
Industrial Calibration
1.0.0
|
This document discusses the "key concepts" and "terminology" that is commonly thrown around. We'll define some of these here so the documentation you find elsewhere in this repository makes sense.
Calibrating a camera in your workspace typically happens in two steps:
In general, calibration routines compute the transform between the camera and the robot wrist or base, respectively. They do so by analyzing images of calibration target: a patterned set of features with known dimensions and spacing. This target is either statically fixed in your workcell if the camera moves (e.g., via attachment to a robot), or it is attached to a moving object (e.g., robot wrist) if the camera is statically mounted. The calibration routines start with a guess about where the camera and calibration target are. They then try to refine that guess through optimization into a more accurate estimation of the true position of the camera and target.
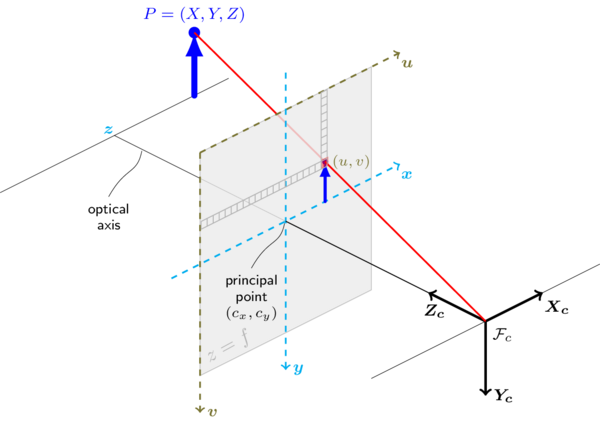
For 2D images, we use the OpenCV model. See OpenCV's discussion at the top of their calib3d module. In brief:
When talking about pixel space, the origin of your image is the top left corner. The +Y axis runs down the height, and the +X axis runs right along the width. Most of the calibrations in this repository assume they are working on an undistored or rectified image.
The core calibrations don't make assumptions about the target; instead you just provide correspondences between sensor features (e.g., in 2D) to target features (e.g., in 3D) given a measurement from the sensor (e.g,. a 2D image). The Target class provides the definition of the calibration target interface. The TargetFinder class provides the definition of the interface for finding such calibration targets.
A number of OpenCV-based target finders are provided. Each target type has its advantages and disadvantages; see the documentation for more details.
This repository provides several calibration optimizations for the following types of problems:
See the corresponding documentation to learn more about how each optimization works.
Just because a calibration converges does not mean it is accurate. Just because a calibration converged to a low final cost does not mean it's a good calibration. If you take 3000 images from the exact same position, you'll get good convergence, a very low score, and really crappy calibration.
This repository includes a number of tools in the analysis module for helping determine whether or not a calibration is good. See the documentation in this section for more details on the available analysis tools.